


I am so excited to be a part of this Ornament Exchange Blog Hop with all these other amazing artist. I hope you will take the time to check out all of their wonderful projects.
This is my Mixed Media project Oh Holy Night.

Let's start creating!
To make this easy Mixed Media project you will need:
- A small piece of wood or a small canvas mine is
- Paper: music sheet, old book page
- Paint Media Decoart: Yellow Green Light DMFA46-26, Cobalt Teal DMFA10-26, Pyrrole Red DMFA18-26, Primary Yellow DMFA28-26, Titanium White DMFA39-26
- Media Decoart Matte Medium DMM20-71
- Media Decoart Gesso DMM18-71
- Decoart Americana Matte Sealer/Finisher (spray)
- Americana Chalkboard Paint DS90-62
- I use these brushes but you can use what is conformable for you: Loew-Cornell La Corneille Golden Taklon: #2-#4 filbert (Series
- Snowflakes stencil
- Americana Glamour Dust Gold DS61-3, Crystal DAS37-3
- Sharpie White pen or any white pen you have, Black fine point
- General Sketch & Wash pencil
- Rusty wire, metal or wood snow flake that you like.

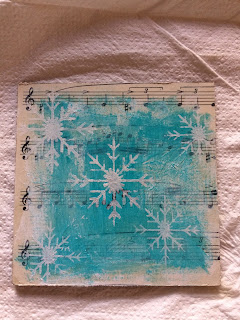
Glue the musicsheet with the Matte Medium, let it dry.
With a nail file, trimmed the edges of your surface to removing the excess paper.

With an old credit card, apply a light layer of Gesso on the paper,
making sure to be light coverage, let it dry.

Dry brush Cobalt Teal start from the center without covering all the surface.

Stenciling the snowflake with Titanium
From the book page cut a scallop strip and glue it on the top, apply Gesso let it dry.

Draw the Christmas tree and the Candy Cane.
Paint the tree with Yellow Green Light, the Candy Cane with Titanium White and after paint the rows Pyrrole Red. Draw a star on the pages of the book, paint it with Primary Yellow, cut it and glue it on the tree. Type and print "OH HOLY NIGHT" cut and glue on . Outline Tree, Candy Cane, Star, Scallop and the words with the Sketch & Wash pencil, with the wet brush go on the drawn line. With the Black Sharpie make the thread on the tree, with White Sharpie dots on the tree, on the Candy Cane, on the star. Protect with spray paint. Glue Gold Glitter on the tree thread and star, Crystal on snowflakes center and on the Candy Cane. Paint the back and the edges with Chalkboard Black. with rusty wire create a handle to hang it. If you want glue or wrap with the wire a snowflake.
****************************************
Sono così felice di far parte di questo Hop Exchange Hop Ornament con molti questi altri meravigliosi artisti incredibili. Spero che troverete il tempo per ammirare i loro meravigliosi progetti
Questo è il mio progetto Mixed Media: Oh Holy Night

E' un progetto semplice e veloce per realizzare un ornament aspettando la notte più magica dell'anno, sul retro essendo effetto lavagna potrete scrivere i vostri auguri.
Per realizzare il progetto avrete bisogno di:
- Un piccolo pezzo di legno o una piccola tela
- Vecchio spartito, pagina di un vecchio libro
- Colori Media Decoart: Yellow Green Light DMFA46-26, Cobalt Teal DMFA10-26, Pyrrole Red DMFA18-26, Primary Yellow DMFA28-26, Titanium White DMFA39-26
- Media Decoart Matte Medium DMM20-71
- Media Decoart Gesso DMM18-71
- Americana Chalkboard Paint DS90-62
- Pennelli Loew-Cornell La Corneille Golden Taklon: #2-#4 filbert (Series
- Stencil fiocchi di neve
- Americana Glamour Dust Gold DS61-3, Crystal DAS37-3
- Sharpie white pen o una penna bianca che avete, Nero punta fine
- Sketch & Wash pencil
- Filo arrugginito, fiocco di neve in metallo o legno
Iniziamo a creare!
Incollare sul supporto lo spartito usando il Medium Matte, lasciare asciugare. Con una lima da unghie rifilate i bordi del supporto asportando la carta in eccesso. Con una vecchia carta di credito stendere uno strato leggero di Gesso sulla carta facendo attenzione a non coprire del tutto lo spartito, lasciar asciugare. Applicare Cobalt Teal a dry brush partendo dal centro senza coprire tutto il supporto.
Dalla pagina di libro ritagliare una striscia smerlata e incollarla in alto sul supporto. Passare un po' di Gesso, lasciar asciugare. Disegnare l'albero di Natale e il Candy Cane . Dipingere l'albero con Yellow Green Light, il Candy Cane con Titanium White e dopo le righe Pyrrole Red. Disegnare una stella sulla pagine del libro, colorarla con Primary Yellow, ritagliarla e incollarla sull'albero. Stampare con il computer la scritta " OH HOLY NIGHT" ritagliare e incollare. Contornare l'albero, il Candy Cane, la stella, la striscia smerlata e le parole con la matita Sketch & Wash, con il pennello umido passare sulla linea tracciata. Con la Sharpie nera fare il filo sull'albero, con la biancastre dei puntini sull'albero, sul Candy Cane, sulla stella. Proteggere con la vernice spray. Incollare Glitter Gold sul filo sull'albero e sulla stella, il Crystal sui fiocchi di neve e sul Candy Cane. Dipingere il retro e i bordi con Chalkboard Black. Con il filo di ferro creare un manico per poterlo appendere. Se volete incollate un fiocco di neve sul filo di ferro.
DecoArt Give Away
Comment to Win !!!
DecoArt is providing the DecoArt product used in this project to one lucky winner. To enter to be a part of this giveaway comment on this blog post. I will select the winner on November 3rd. Each artist in this blog hop will also be offering the DecoArt Give Away so check thier amazing ornaments using the links below.
DecoArt fornisce i prodotti DecoArt utilizzati in questo progetto ad un fortunato vincitore.
Per vincere commenta questo post il vincitore verrò estratto il 3 Novembre.
Ogni artista di questo blog hop offrirà il DecoArt Give Away segui i link qui sotto
Day 1 October 17th


Day 2 October 18th

Day 3 October 19th

I hope you are enjoying this Blog Hop and are inspired to paint some ornaments. Please share your creations with us on FaceBook.
Special Thank you to DecoArt and Cupboard Distributing for sponsoring our blog hop.


21 commenti:
very cute design...love the mixed media....have done a few myself....thanks for the Christmas one.
Adorable! Thank you for Sharing, Franca. :)
Thank you for participating in the DecoArt Blog Hop. Enjoyed seeing your ornament.
Thank you is super awesome...I love this mixed media ornament.thank again for sharing with us
Love this design Franca!! Can't wait to paint it! thanks for sharing.
....quando la semplicità vince! Grazie Franca! Bel progetto, chiaro il tutorial!
Grazie per l'opportunità di vincere i prodotti Decoart😍😍😍🤗
Bravissima come sempre!!! Un abbraccio ciao
Love the mixed media, just wonderful
Love this whimsical design. So cute!
I learned something new every time Thank You.
Thanks for the pattern
Un bellissimo progetto , grazie Franca!
Thank You so much for this wonderful gift to us!!
Thank you Franca, your post looks great and I love your design. So glad that you are a part of the blog hop
This looks like fun!
Thank you Franca!
Bello e divertente il tuo progetto! Grazie per l'opportunità Francuzza!
Very inventive to use the sheet music Franka :-)
Love it!
it is Embroidery Digitizing Service for all
Posta un commento